Tuesday, December 23, 2014

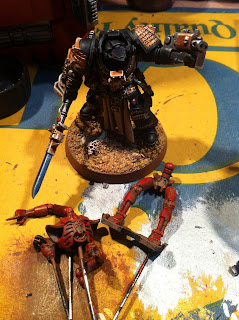
Finished - Ordo Malleus Heretical Inquisitor

In my last post, I spoke about a Ordo Malleus Inquisitor in Terminator Armor and eluded to my love affair with the Inquisitor Codex. Thanks to finishing the Eisenhorn books, after finishing the golden boy of a puritanical Inquisitor, my thoughts drift to what a heretical inquisitor would look like. I have had an extra Fabius Bile body that someone had cut the head off of and I have always wanted to make either a Fallen Dark Angel or an Inquisitor. Later, while working on my Iron Warrior Bikers made from Chaos Knights, I saw this Chaos sword that screamed to me "daemon weapon."

At this point the bits I had were dictating the rules for the mini. I knew he was going to be an Inquisitor in Power Armor with a Daemon Weapon. This is far from ideal as Inquisitors are only S 3 and T 3. Give them all the armor you want, but with those stats they are going to get eaten by any other troops in close combat. The Daemon Weapon is also problematic as the particular stats of it are randomly generated. You may end up with something little better than a stick or you may end up with a S 6 AP2 weapon. It is nothing to be relied on from game to game. 

I start to realize that I am making a mini that is just for fun to paint and look at and may never see play on the table top. In some way this is freeing. Now I don't have to worry about effectiveness and posts cost and can just do whatever I want.

Tuesday, December 9, 2014

Editorial - Playing Your First Game against a New Person

I have my first game coming in ages coming up and it is with a new person. I was in the process of making my list and I began to stop and reflect on my choices. I thought about what this list says to my opponent about me. You only get once chance to make a first impression and that first game can be a last game if you don't start on the good foot.

I had a game last year with my friend and his buddy that I had never met before. It was the two of them against with 1000 points against me with 2000 points. Normally with 2v1 and even points, I would stipulate that both sides use only one Force Org chart to keep things even. Not doing that opens up the game for abuse (this was back in 6th before the Unbound nonsense), but my friend was a classy guy and I assumed that his friend would be classy.

I was wrong.

Sunday, November 30, 2014

Ghost Ark "Epic" Post


This post has been sitting in my draft like for a year. It roughly details how I painted the Necron Ghost Ark. I am just going to throw the pick out because this post is never going to get written. If the formatting is a little strange it is because I am doing this on my phone on vacation. 

The basics are I wanted a Necron scheme that was not the dry rushed metal that the codex has. I thought about doing them in a bone scheme but was not good enough at bone to pull that ows at the time I started. I ended up settling for a concept that is a rusty robot that is in the process of repairing itself. Someone commented that it looks like what a robot might think that camo looks like. 

It starts with a brown base thay is stipples red then orange. The metal areas are carcharodon Granite then chain mail. The whole model is washed agrax Earthshade then touched up. 

Friday, November 14, 2014

Finished - Bloodslaughterer

I got this mini, like so many others, in a trade. I was excited to get him and got a great deal. I am glad the deal was good because he was assembled so poorly that I considered scrapping it. Glue was gooped everywhere and the legs were a jumbled mess. It was also missing a few bits for the legs.

I started painting this mini back in June 2014 before I got married and moved across the country. He had to be packed carefully because he was not clear coated and shipped almost 3,000 miles in a moving container. On the other end, he was unpacked, finished painted and assembled.

I don't know that I did anything really special here but it does get quite a few comments whenever I bring it out. I think I made a good approximation of the way the Blood Slaughterer on the Forge World site. I think there is a little more orange in their red and my shadows are a bit darker.

I like the final product and it is a good clean paint job for me and at about 8.5/10 for me. I could have gone for a little more detail but the kit already took forever to paint. I like the little extra details on the base (Chaos symbol, skeleton and SM helmet).

Thursday, November 13, 2014

Finished - Belakor

I am pretty impressed with how this guy turned out. I used some pretty simple techniques to achieve some pretty complex results.

I got Be'lakor in a trade on Bartertown. He was resin and incomplete, neither of which is optimal. I got a screaming deal on him. He is a difficult mini to find as anyone that has him only has one and they want to keep it. You do not see him up for trade often and in metal he is very rare.

I started by looking at pictures of Be'lakor painted on CoolMiniorNot and in his Codex. (I also found an Australian Death Metal band based on this mini while searching.) I disliked the grey color scheme that was in the Codex and wanted something a little more colorful but still muted. I have been wanting to learn to paint purple better and thought this was as good of a chance as any. I also liked the light below/dark above pattern. Sharks and older planes have similar colors.

With the color scheme chosen, I had a little conversion work to do.

Saturday, November 8, 2014

Agrellan Earth and Crickle Paint revisited.

After the failure of trying to use Agrellian Earth to paint veins, I decided to give the technique a fair shake by getting some crinkle paint and trying the process they way they described it. 

Normally this would have started with me buying some purpose-made crackle stuff for minis but I didn't want to wait for shipping.  I started my process by trying to get some Weathered Crackle Glaze at Lowe's but sales person said they do not carry that. Now, I have had some experiences with Lowe's where their reps on the floor know nothing about hardware or products so even though I could not find it and the sales person could not find it, I don't know for sure that it is not sold there.

Next, I went to Hobby Lobby. I've never had an opportunity to go to one because there where not where I lived before. Since I moved, there are two very close to me. They don't really have anything a Michael's would not have which is good because they are run by awful awful people.

Sunday, October 26, 2014

Finished - Black Knights

Done at last. Done at last. Sweet Emperor, I am done at last. 

I've written about my experiences with painting "more faster" with these Black Knights before. The basics are the client asked me to paint a lot of minis fast for the same fee that I would have accepted for painting a few minis very well. I typically paint every mini as well as I can regardless of if it is a Tactical Marine or my HQ. I may spend a little extra time on more important minis, but for the most part they are all painted to the same standard. 

With these guys I ended up doing some things that were not specifically required to have them painted to the standard that we agreed on. For example, I probably could have gotten away with only painting the metal silver but through that might look too plane. I added in some gold areas to break up the monotony. Also, while painting these Knights, I thought they looked a little too clean and near for being resurrected, undead horrors so I added a two stage rest to certain areas to add some age to the mini. I only used red rust but was tempted to use some green patina to the gold areas. 

Monday, October 20, 2014

On the table now - Khorne Helbrute

 I am taking a break from comission painting. I was inspired yet again expand The Cult Troop Project to a larger scope. Initially it was supposed to be the chosen number of each type of CSM Cult Troop. Then it was some Daemons of each type to go along with the CSM. Then it was Daemon Princes. Then Greater Daemons. Now I am going to do a Helbrute for each Chaos God. 

The Khorne one was easy to decide on. All close combat. I was inspired by this Helbrute with Bloodcrusher face. It was difficult to find the original artist as Man-boy "Genius" likes to post other people's work rather than do his own. I wanted two close combat arms but did not want two Power Fists. The Power Flail is an awesome appendage that reduces enemies Attacks. That's advantageous for a Helbrute because close combat attacks that could hurt a Helbrute (Power Fists, Smash, etc). Unfortunately it does nothing for Melta-bombs. 

Typically, the Power Flails are left arm weapons but rather than turn this Helbrute completely around, I tried to convert the Flail to the other side. I did this by turning it upside down and mounting it under the right shoulder plate. This took quite a bit of green stuff and some luck but it all worked out. 

Sunday, October 12, 2014

On the Table - Black Knights

 Just finished the second set of Black Knights and I've hit the wall. I ran out of steam after just 9 minis (which is about right for me). I had to take a little break before finishing the last 5. I work on the Khorne Helbrute for a little bit to refresh and unwind. 

The client requested that the minis be painted fast but did not care if they were painted to my best standard. That is not how I normally roll but I bit anyway. Now that I am 2/3rds of the way through, I am regretting that choice. Rather than zipping through them, I ended up painting them a little better than we negotiated and it took longer than I anticipated. In the future I don't think the "more faster" is a plan that is going to work for me. 

Thursday, October 9, 2014

Army Feature - Trevy the Great's Space Marines

I saw Trevy's army up for grabs on Bartertown. While I was not in a place to drop what he was asking for a fully painted army, I was impressed with his cohesive color scheme, pervasive conversions, his composition, the detail painting and the extra work he did on his basing. It is clear that he put a lot of extra time and effort that he did not have to into this army. The end result looks good on the table.


Now if this were a BoLS Army Showcase, after that paragraph that took 7 min to write, there would be a giant copied and pasted section written by the person that painted the army followed my 5 or 6 pictures posted with no thought, insight or analysis. But that is not how we roll here at TMM. We use effort!

Wednesday, October 8, 2014

Finished - Gravity-bearer

I finished the second Combi-weapon Bearer so it is officially now a thing. For my second attempt, I chose a Combi-gravity from the Sternguard plastic set. I wish I knew the names for the side-by-side vs the over-under Combi-weapons but I do not. I would love to be consistent with my conversions, but there are a lot more over-under weapons than side-by-side. 

As for painting, I used Agrax Earthshade to shade the robes rather than Sreaphim Sepia which accounts for the differences in color tone. I chose to paint his cute little feet blue to match the Gravity effects. I know that I paint my Plasma weapons blue too, but I don't care. The Gravity weapons are visually distinct from Plasma weapons enough. 

For the value of this mini, I would put it on par with the other Combi-bearer ($30). The conversion work was a lot less than erasing that evil metal helmet with a Dremel. It mainly consisted of clipping off the sword and re-sculpting the mini a little. 

Painting Veins with Agrellan Earth

I am going to try something new. I saw this article on BoLS about using the "cracked earth" technical paint to quickly and easily paint veins on wings. Now for the most part BoLS produces nothing but garbage, but this may be closer to compost. For starters, notice the article is titled “Painting Veins the EASY Way” with the emphasis being theirs. The focus on BoLS is for fast, easy, and low effort and how you can dry-brush, net-list or rules-lawyer your way to the middle. It shows in everything they produce, but there may be something interesting here.

Even though Caleb Dillion does not understand how to capitalize properly or how to do an aside, he hints that, with flesh tones and layering of colors, you could use generic crackle medium to compose a variety of effects. It would be interesting if there was a technique that allowed for those effects without the effort, but I am dubious.

I was going  to use this on an in-progress Bloodthirster but there is no way that I am going to experiment on a almost finished model. I painted this base Mordian Blue and let it dry. Then I covered it Agrellan Earth and let that dry. Then I covered it with Mechrite Red. You can see the results for yourself on the top picture. 

Then in the middle picture I thought that if I colored the Agrellian Earth with Mechrite red and put that over Mordian Blue, that might work. Nope. When diluted down, the Agrellan Earth does not crack. 

In the bottom picture, I just painted Agrellan Earth over Mordian Blue. It makes these tiny cracks but still looks like dried cracked earth. 

In the end I call this a fail. I'll try again with crackle medium but I think my Bloodthirster's wings will have to be painted the old fashioned way with effort, hard work and skill. (See how I brought it back around?)

In the end, I can say that Agrellan Earth is really only good making a cracked earth base. That makes its utility really low. If you are going to base your army in this manner, Agrellan Earth is the easiest way to do that one thing. If you want to do anything else with cracked textures, then a crackle medium may be a better bet. 

Paint for Minis - Black Knights

I made another arrangement for painting minis for gear. I traded a Battlefoam Shield Bag with pull and pluck for 14 Black Knights painted to a table top standard and fast. Now, I do not do those last two things very well. I always try to paint my best and it takes a lot of time. I thought I would have been able to blow through them by not painting them as well, but I was wrong. I still have the urge to give them crazy detail but am trying to fight it. I tried to dry brush the bone parts but it did not turn out as well as when I paint in layers. 

It took about 10 hours to get 5 horsies almost done which is still pretty fast considering that each mini should be taking me 6 hours each if I was taking my time. Toraman and I did not hammer out a deal very well which is the big stumbling block in this new business. I need to come up with a better formula for making these trades. 

I think that 2x retail for trade value is a good starting place. I actually think my painting is worth a bit more than that, but I don't think people will give me a new Land Raider for painting 10 Marines. 

I don't think that I should try to paint average and fast again as that is a lot of work and little money. 

Wednesday, October 1, 2014

On the table now - Bloodcrushers

 The Blood Crushers are coming along. I made a mistep on the basecoat step by starting with Mechrite Red and then giving a light dry brush of Evil Suns Scarlet That made for a base color that was not easily to be touched up. After I ashed the recesses and brass areas, I tried to touch up the read areas but my touch ups were brighter than the unwashed red areas. FML. 

I also noticed that while painting the Defkoptas, that the Agrax Easthshade was cracking in areas where it pooled and leaving a white film when it dried. I tried to take some pics but was not successful. In either case, a little Nuln Oil fixed it but it is a pain to need to wash something twice. This pot did move across the country with me so maybe it got too hot or cold. Regardless, I am halfway through this pot so may just bear it for now. 

I also tried a purple lighting on the eyes and vents on the chest by painting those areas White Scar and washing it Leviathan Purple. It did not work out well even after I touched it up. I need to make better friends with purple as I have with blue. 

Wednesday, September 24, 2014

On the table now - Bloodcrushers!

Blogging has been on hold as I have been in a flurry of painting and not really into typing. Can't do both at the same time and when the spirit moves me to paint, I obey its call and writing falls by the wayside.

On the table now are three Bloodcrushers that I traded for on Bartertown. They were in pretty shabby shape when I got them. After ripping them into bits and priming them red, I started on the base pig-dog things. My intention is to paint them red, bronze and silver with glowing white elements on the eyes and side vents. After that, I'll start on the Bloodletters. 

Finished - DakkaJet/Ork flyer

You didn't even know that I was working on a Dakka Jet did you? I traded for this assembled mini on Bartertown for a Vindicators. The guy "accidentally" forgot to send the clear canopy then had the gall to bitch about me taking a few days to ship. I left good feedback for him but only because I thought he was someone else. 

It looked like he based the mini in Mechrite and washed it in Agrax Earthshade. Poorly. There was pooling, dry lines and uneven wash. It was like a checklist of how you are NOT supposed to paint vehicles. I started by retouching the Mechrite but trying to leave the places he managed to wash properly alone. After that, I got the rest of my base colors down. Mordian Blue for the blues, Chaos Black for the black, Mournfang Brown for the golds and Carcharodon Granite for the chips. 

Sunday, September 21, 2014

Finished - Komissioned Koptas

These minis mark the start of a beautiful new age. 

My goal is to get people to give me bits, minis and books for already painted minis that I have done. My ideal arrangement would be something for nothing, but so far no one has gone for that trade. This is the next best thing. They get painted minis and I get more plastic crack. 

I shy away from painting for money because I find that it is hard to make it worth the time. People really do not want to pay for painting. I had a guy offer me $5 to paint a mini that would take take 10 hours to do properly. Not worth it. 

I am hoping this a the start of something good. 

Tuesday, August 26, 2014

Finished (mostly) - Be'lakor


For going into his mini with no idea of what I was doing, I think he turned out pretty well. I do not have a lot of time to make an epic post about him. Just waiting on a base for him and once that is done I'll write him up proper. 


On the table now - Be'lakor

Just started Be'lakor and am very excited to finish him. Really I started him a while ago but never got around to posting him. I based the mini with Daemonette Hide and Rakarth Flesh. I did not have a very good plan going into this mini, but planned to wing it. We'll see how that turns out. 

Monday, July 28, 2014

Finished - Three Chaos Spawn


These are some of the last minis that I finished before getting married and moving 3,000 miles (hold your applause). I got the in a trade on Bartertown and was screwed. This is the reason that I value not-new minis at less than 50%. It is clear that someone just got crazy with the super glue and stuck some bits on a Spawn torso.  They were a mess when I got them. 

I am particularly paroud of the red one in the middle. I turned his two main arms around backward and glues chainswords to the elbows. Really makes for a messed up-looking mini. 

I tried to paint all three in subtly different ways but the two flesh ones came out very similar. Overall I am pretty proud of how they turned out. 

Finished - Winged Daemon Prince


I fixed the monochromatic mistakes from earlier by adding color (gasp). I used a liberal application of Seraphim Sepia to the recesses to give the illusion of shadow and tie the skin into the armor. I also added armor plates on the hips, knees and shoulders to make it look less like a gargoyle and more like a 40k Daemon Prince. I also added a loin cloth to cover up his naughty bits. 

In the end, I think it turned out well. I am happy enough to field it but it is not likely to be a first string model. It will likely ride the bench except for Apocalypse games and if I field a CSM flying circus. 

I especially like the negative space created by the raised base and the wings. I also like how I bent the wings rather than leave them flat. 

I dislike the overall blackness and obvious pieced-together look of the mini. The armor bits stand out in a bad way from the rest of the mini. Overall, it looks like a conversion and no conversion should be that obvious if done well. 

Monday, July 21, 2014

Finished - Tau Etherial Conversion

I made this Tau Ethereal from an Island of Blood High Elf Mage. I traded for the base mini on Bartertown for a song ($5 if I remember right) and uses a Fire Warrior head. Carving the Elf head out was harder than expected and if I was going to convert the mini properly, I would have shaved off a finger of each hand to make it a real Tau. Unfortunately, that idea did not occur until I was already painting. 

As a conversion it works great. The only mistep that is not correctable is the magic smoke that the Mage is standing on. Tau don't cast any magic and him standing on that crap only make him a better target. 

I had some problems deciding on how it wanted to paint the ice blue that I painted the rest of the Tau army in on this Ethereal. I did not know how white or how blue I wanted the fabric and went back and forth several times. I think the end result does not look unduly out of place next to the other finished Tau though. 

Saturday, July 19, 2014

Finished - Ork Warboss

I have a couple of these AoBR Warbosses laying around so I decided to bang one out. I am unsure as to how I wanted to paint him in terms of what Ork Clan he belongs or does not belong in. I painted him in a very generic color scheme. All or most of the metal areas are in a silver or bronze color scheme. I used a little red and an accent color but tried to keep it to a minimum so that he could fit in with any Clan. 

I feel like this mini turned out. The metals are understated but well done. I could have put more detail into it but that would have made it take much longer to paint. Three things that turned out well are the skin, the conversion and the weathering. 

I think I have a pretty good system for painting Ork skin and it is unique as far as I know. It starts with a base of Hormagaunt Purple. I can hear the gasps now. Using purple as a the base for green skin gives kind of a contrast and makes the recesses look black without being black. After that you climb the typical green ladder. Snot Green to Goblin Green, wash Thraka Green and touch up with Goblin Green.

Thursday, July 10, 2014

On the table now - Disappointment


This is Reaper mini that I picked up on a trip to a CLGS in Seattle in 2009 for a song. I think he is simply called Gargoyle. He sat in my bits box for 5 years before I got around to painting him. I don't know if that speaks more to the depths of the backlog of the things that need to be painted for my expertise in procrastination.

When I primed this mini, either it still had some wicked-persistent mold release agent on it or the humidity was too high. either way, the primer wanted to rub off at every turn and just getting paint to stick without chipping off was a challenge. 

Monday, July 7, 2014

Finished - Plasma-bearer

I banged this little fracker out in a hour or two. My plan is to use him as a counter for Combi-weapons. It is easy enough to know that he stands for a combi-plasma weapon when using it for a lone IC but you may ask, "How will you know which model carries the Combi-weapon in a mixed unit?" I will tell you that I'll keep him in base to base with that model. That way he will not only denote which model has the combi-weapon, but which if he still has the one-shot use left in him.

The only difficult part will be remembering to roll for a bolter rather than a storm bolter after the combi-weapon has been used. That is really only applicable in a unit composed of Storm Bolters and units composed mostly Bolters will not have any change in their utility regardless of how many combi-weapons are involved.

In the end, I am avery happy with how this mini turned out. I like that I will not have to convert and model a combi-plasma for every mini I own and that I now have a counter for the minis that do have combi-weapons.

I think this is the first mini that is not only painted to a table-top quality but is designed to be viewed from arms length. Up close, this mini does not look so great. But put it at arms-length and it looks awesome. This is a new thing for me as I usually paint minis that look good up close but just ok on the table. I am not sure how I feel about this.

It is hard to value this mini. The Watcher In The Dark mini is kind of hard to get a hold of as the only way to get it was with Azriel who is discontinued in metal. Granted, he was around for ages so there is a fair number of these loose minis floating around in the secondary market. A quick search for completed auctions on eBay says these minis go for $2-$8 with the plastic ones going for $2-$4. The paint job is a 5 of 10 for me so it is hard to charge more than $10 for it. What took forever is the conversion and getting the bits. The conversion work took some lengthy and delicate Dremel work that I value at about $10 because it took 2 solid hours. The bit is hard to value because it is not readily available. with some luck, it might cost $2-$8 to replace it.

Final total using averages, this mini comes in at about $30 which is about what I would let it go for in trade. That would get me a small box of infantry which I feel is fair considering how many times I ripped my thumb open with the Dremel. 

Saturday, July 5, 2014

Finished - Daemon Prince of Nurgle


Finally finished this Daemon Prince of Nurgle and I could not be happier. He came a long way from my last post about him. Let's take a closer look.

Modeling

As for conversions to the base mini there are just a few. A hook broke off the chains of his sword. I could have replaced it, but experience with small, fiddly bits like that falling off has taught me that gluing things like that back on usually just leads to them falling off again. Best to just Let It Go.

I also gave him an extra pauldron on his left shoulder from the plastic Daemon Prince kit. Because I liked the exposed muscle on his left arm, I cut out the center of the Chaos circle to let it show through. You can't see it from the pictures, but I think it turned out pretty well.

Saturday, June 28, 2014

On the table now - Daemon Prince of Nurgle

 I decided to start a new project. My plan is to paint a Daemon Prince for each of the 4 major Chaos Gods (plus a few Undivided) but I want to use alternative models from the currently available plastic kit. I used this page as an inspiration. I am going to tag it under "Cult Troops" for the purposes of this blog. 

I have my eye on a few already. For the Khorne Daemon Prince, I want an Ultraforge Wardaemon. I will get a Greater Wardaemon at some point too, but I feel that that particular model is too big for a Daemon Prince. I would really want one of these Molocks from Confrontation but not at $90. I want a Nekima from the Neverborn line from Malifaux but she appears to be out of print. Instead for a Daemon Prince of Slaanesh, I think I am going to go to Europe and get a Nalach, the dark shadow. I have no idea what I am going to do for a Daemon Prince of Tzeentch as of yet. 

To kick things Off I have a metal GW Daemon Prince of Nurgle on the table. I am using a lot of the same techniques that I used on my Plague Marines but at the same time am trying to up my game. 

Thursday, June 26, 2014

Finished - Skulltaker

I can't believe it only took my a week to paint this guy. I think the only things I needed to do on this mini since I posted about him last was to paint some black on the flames. I have been in a kick lately of painting single models from start to finish rather than batch painting. I find it much more rewarding, gratifying and faster. 

I am going to try some new things on my Finished articles by talking about 2-3 thing I liked about how the mini turned out and 2-3 things that disappointed me. 

I like how the base turned out. I was worried about adding so many skulls and that it would be overkill. I think that the attention with painting and the extra sand between skulls diffused that. I also like how it gives the model a lot of height. He is head and shoulder above Terminators. I like the cape from start to finish. I like the black on the inside and how it frames the red skin well. I like the skulls on the back and the hooks. In some other images of the Skulltaker, people paint the skulls too white and the hooks too bronze and it looks weird. I think that the sepia and mud washes homogenized the colors so that nothing stands out. 

Friday, June 20, 2014

On the table now - Skulltaker taker of skulls

  I got this bad boy in a trade on Barter Town. He was painted okay but with a little touch up I think I can get him looking stellar. He is going to be painted in the same scheme as my Bloodletters with two exceptions. His nails, fore and aft, are painted as metal. I should have done his teeth that way too but I did not think it would look good on his face. Also different are the spines on his back. On the Bloodletters, they are painted black. On the Skulltaker, they are red. The reason for this is the skull cape. The black spines would need to be washed black and I worried that I could risk darkening the white skulls too much. The red only needed to be washed red and sepia. 


I also did not think that there was enough skulls on this mini for someone called "Skulltaker." I used two piles of them for him to stand on and tried to incorporate the skulls under his right foot into the mix. It worked mostly but I broke three drill bits trying to drill through it all. In the end I just glued him to the skulls and then drilled through the base and into his foot to pin it. 

Tuesday, June 10, 2014

We All Get a Little Bored Sometimes

It all started off with biting off more than I could chew with that damned Ork Wrecker. It is a
massive undertaking to convert an non 40k model to be usable in 40k. Perhaps I bit off more than I could chew and that is what lead to me stalling out. At first, work went swimmingly. The frame and cab assembled and converted nicely. When it came to converting a driver and gunner for the cab, things kinda stalled out. I did not and still have not found a way to insert a couple of Orks into the vehicle in a way that pleases me. So I would push off working on the Wrecker and work on other projects. Since I started the Wrecker, I have finished 25.5 minis. That's a lot of productive procrastination.

Now, I am out of side projects or small projects to paint and I do not want to go back to Wrecker. I am bored with painting. I sit at my desk for hours just looking at my minis an bits and thinking but brushes never touch anything. I have things I could paint. I have things that I should be painting but I do not have the drive. I have the mini painter's version of writer's block.

What follows is an article on some of the things that I do to break myself out of this sort of funk when it settles over me.

Monday, June 2, 2014

Warhammer 40k 7th Edition - Something Has Changed

Only two years have passed since GW rolled out 6th Edition. Why would they release a new main rule book? The cynical will say that it is just to make money and, while that has to be a component of it, I (in this instance at least) will give GW a little more credit than that. While it may be a good idea in the short term to release a new book to drum up some sales, that plan comes with more than just a few downsides and the cynics are breezing by.

The main drawback to releasing a new main rule book is that producing such a tome takes money. A lot of money. You have to pay writers, proofers, artists, binders and distributors. It takes a lot of money to get a book from the brain to the page to the printer to your hands. That is a considerable investment that is not easily thrown away. It is that investment that dictates the schedule of releases for the rule books. Have they made enough money from the last edition to recoup their investment.

Thursday, May 22, 2014

On the table now - Cassius and Librarian

I am in the process of  rehabbing an old Librarian to get ready for the upcoming Psyker-pallooza that 7th is reported to be. I already have the Librarian from the Dark Vengeance set and another one that I converted from the Chapter Master. That's two with Force Swords. I want one with a Force Staff in case GW makes them better. Also I am banging out Chaplain Cassius. I already have one that I filed off the Ultramarines omega symbols and painted him up like a Blood Angel. I wanted a normal one just for fun. 

Tuesday, May 20, 2014

Step by Step - Blue-White Crux Terminatus

Short and sweet today. Unlike the Blood Angle step-by-step, I am going to stick to the facts and leave the novel out. In this article I am going to give a detail of how I paint my blue-white detail. This is great for Blood Angles with all their wings but it also works great on chest eagles. If you are adventurous, you could also use it for Power Weapons, Thunder Hammers and Storm Shields. I like it on the Crux Terminatus. This technique is a good detail and contrast. It draws attention without overwhelming the mini. 

1. Base Celestra Grey


2. Wash Asurmen Blue


3. Touch up Fenrisian Grey


4. Highlight Celestra Grey and hard edge Skull White


Pretty much that is it. At each layer you want to leave a little of each layer underneath showing. Pay more attention to the tops of surfaces because those are the areas that will reflect the most light. At the end, you should only use a minuscule amount of white. Less is really more at the end. 

Sunday, May 18, 2014

Step by Step - Blood Angles

"My other arm is over THERE!"
My other two step-by-step articles seem to be pretty popular, so I decided to try another one. This time around, I am going to tackle something that I am a bit of an expert on, painting red Marines. Blood Angles were my second army that I started in about 2007. I ruined about 50 Marines before I began to figure out how to paint red in a way that I thought looked good. Since then, I have finished a Battle Company plus more  of angry, red, armored killing machines. 

I've made a lot of mistakes and had to learn some hard lessons. What follows is worth about 4 years of worth of painting experience. My way may not be for everyone, but it works for me and produced results that get me compliments every time I take my minis out. 

The basics of how I paint are 1. Basecoat, 2. Wash, 3. Touch up, 4. Hard edge highlighting. There are a few departures from this, but that is essentially it. It sounds really easy but the skill comes in what washes to use and applying them with finesse. If you can't tell from my rants, I am not a fan of dipping or overusing liquid talent like Dev Mud. I prefer skill and precision in my painting. I feel that gives a better result. I am only going to paint these minis once, and to not do my best on each one does a disservice to the minis and my skills. 

Brace yourself, because this is going to be a long long ride. I have a lot to say on the subject of painting so there are going to be a lot of words to read. Don't be daunted! There are some great pearls of wisdom tucked in those walls of text. 

Saturday, May 17, 2014

Finished - Commisar

I got this guy for a song on Bartertown and decided to paint him up for fun. I listed him on a Bartertown trade site and got a Stronghold Assault. I had the PDF of it but a $33 book for a mini that maybe cost me $10 and a few hours is a good deal. The thing that kills it is the shipping. I try not to think too had about it as it would mean that I would never do this sort of thing. It is like the price of admission. You just take for granted that both parties are going to pay $5-$15 for each transaction.

I had no plans for this mini. I do not play IG/AM and don't really have plans to. I was going to use him as a Lord Commissar for an Militarum Tempestus army that is in storage but why would you ever give a Commisar a Power Fist? Seems silly.

I honestly thought the book was $55 like a Codex but $33 for this mini is not bad. 

Monday, May 12, 2014

Finished - Termie Captain, Horrors, SW Torso

Those fracking Horrors have been on the table for ages. Maybe a year but probably at least 6 months. Theirs is a long a storied tale of desperation, ambition, betrayal, disappointment and perseverance. Ok well maybe not betrayal unless you could my paint betraying me. 

I started them after the Bloodletters but never made an On the Table post about them. I based them in a blue Foundation color and drybrushed them a green Foundation. After that I drybrushed them in an interference paint. I either washed them in either green or blue. I think most of them got green. 

The end result was disappointing. It was too dark and did not have the iridescent effect that I wanted. After Googling a Jeweled Beetle shell and getting sloppy with my Sepia wash, I became a little more happy with the results. The sepia in the joints and recesses added in the red color that the minis was missing. 

Friday, May 9, 2014

On the table now - Terminator Captain with Lightning Claws

Still on hiatus from the Ork Wrecker. I am using putting that project off to clear some long term projects from the painting table. That's productive procrastination. I finished my Terminator project for the moment with three squads of 10 men each and I am rounding out my TDA HQ and special characters. I already have a Captain with TH/SS based on Lysander and a captain with PW/CP based on the Space Hulk Captain. Now that this guy is complete, I have all permutations of of Belial only red. 

This mini is based on the most awesome LC Terminator from Space Hulk. I already had a mini of him from a trade on Bartertown. That mini had all the BA symbols destroyed and it took me a long time to rehab it. 

To convert this mini a Captain I had to do some changes. I dremeled out the face from the front piece in order to do a head swap. I also clipped off the chain on his right shoulder guard in order to apply some wings to the shoulder. I nicked a cape from the Deathwing box (also a trade from Bartertown) because any good captain need a cape. Initially, I wanted to use a Grey Knight head but, in keeping to having all my Captain bare-headed for good personality, I elected to swap for a Blood Angel head. 

Monday, May 5, 2014

Finished - Warsmith and Yarrick

 The Ork Wrecker sits on my painting table just looking at me mockingly. I knows that I maybe bit off more than I could chew in converting and painting and it laughs an evil laugh. So I am taking a break to clear some more minis out of the backlog. 

I traded for both of these guys on Bartertown in different trades. The Warsmith was rehabbed from a Sons of Horus color scheme of sea-green and gold that was atrocious. I painted him in my traditional Iron Warrior color scheme of chainmail, yellow and gold. I was tempted to convert him up a bit as I have an old metal Warsmith from ages ago that I converted to have a servo harness and that mini would be a great stand in for a Warsmith. In the end, I saw that any wargear that I might put on a Warsmith did not necessarily need to me modeled or could be placed on a separate base. 

I think he turned out ok. There was not much room for creativity in his paint job. I showed some spunk in painting the whole left shoulder guard yellow and letting the recessed areas be black stripes. Other than that and the ax (not visible in this photo), there was no opportunity to paint the yellow and black stripes on this mini. I did do a head swap for a horned helmet from the WFB range. I would give this guy a 7 of 10 for my skill. I think he would get a 7 on CMoN. For some reason newer minis tend to get rated higher as does conversion work and metal-colored minis. I don't know why that it but the trolls tend to rate shiny thing higher on there. 

Yarrick was bare metal when I traded for him. I don't even play IG/AM but I love this mini. I am experienced enough at painting his core colors to tackle this mini. I wish I had painted the claw different colors. I did not read his background until after I started painting him. As the claw came from an Ork Warboss, I would have liked to have it a little more beaten up. I could see him wanting it guilded to cover up the Xeno taint, and that's just what I will tell anyone that asks. 

I think this is a decent mini. There are a lot of him out there floating around and I do not think mine stands out from the middle of the pack. I think it is a 5 of 10 for me and maybe a 6 on CMoN. I rate him so low because I really cheated by painting large swaths of the metal the same color when a more detailed approach would have been braver. 

Thursday, May 1, 2014

Finished - Long Strike

 I am taking a short break from the Ork Wrecker (which is proving to be pretty frustrating) and painted up a Tau that I got in trade from Bartertown. I am keeping up the theme of panting named characters in unique colors. I wanted Longstrike red but at the last moment, changed it from blood red to a maroon red like Flesh Tearers. I think it turned out pretty well. I would give it a 7 of 10 for my skill. On CMoN it might score a 5 or 6. 

I had particular trouble with the skin. I am still unsure how to make blue skin look lifelike. I tried giving them red insides on the mouth and nasal slit, but now I just think it looks funny. It works on this mini because it ties into the red armor. I don't know what I am going to do if I have to paint more tau flesh. 

Monday, April 28, 2014

On the table now - The Horrors, the Horrors

Ugh! I started painting these guys a long time ago. I was not satisfied with how they turned out and pretty much just swept them to the side of the painting table. There they collected dust for months. Every once and a while, the painting table gets too cluttered with half-finished projects and I spend some time just finishing things. These stupid Horrors are one of those things. 

My idea was to paint their skin in a blue/green iridescent color reminiscent of a Jeweled Beetle's shell. I had done something like this with my Vespids. It was as easy as drybrush green, drybrush blue, drybrush interference paint. It was simple and looked great from what I remember. That is what I did to these guys and it looked awful. I tried to fix it by washing it green or blue and nothing helped. I became disgusted and give up. 

Monday, April 21, 2014

House Rule - The One

 We've all done it. Rolling a single die and have it come up a 1. That is so frustrating! It makes you want to say, "I wish I has not run/shot/etc at all."

A while back, I proposed a house rule to my mate Keith to have a fun way around this. 

Enter the One Token. Holder of this token can re-roll a single die. It has to be a single die like a run roll, single to hit roll, single reserve roll. Roll that are ineligible are things like Leadership, to hit rolls that are rolled in multiples (examples to follow), or anything that has already been re-rolled. Once the roll has been made, you must accept the results even if they are another 1. That's tough luck. Once the re-roll has been made, the holder of the token passes it to his opponent. 

Specifics on which kind of rolls are acceptable and which kind are not. The key is that it has to be a single roll. A SM Sargent with a Powerfist gets 3 attacks on the charge so none of those rolls are acceptable. But a Techmarine with a Servo-arm gets a single Powerfist attack. If that roll was a 1, it could be re-rolled with the token. 

Friday, April 4, 2014

On the table now - Wulfen and Njal


I am trying to clear the painting table of in-progress pieces before starting the Ork Wrecker and Speed Freak Lootas. Part of that is the Wulfen that I bought off Bartertown a while back and Njal Stormcaller that I am painting for a friend. That base colors are done on them all and the first wash for shading is also done. Now the painting starts!

After these I have 5 back packs to do for the Wulfen and then we start the Wrecker. Real talk, I am putting it off because of the time it is going to take to turn a non-GW model into an Ork vehicle. I am daunted and thus do not want to start. Once I am out of side projects and excuses, I'll have to start on it. 

The sprues are primed. The painting table is almost clear and I am almost out of excuses. Maybe I'll turn it into a step-by-step WIP and that will motivate me. 

Tuesday, March 25, 2014

Finished - Big Mek with Burna

I have never in my life see or even heard of someone taking a Big Mek with a Burna as an HQ choice. Really, all I have ever seen are Warbosses and Meks with Shokk Attack Guns. I didn't even know you could do this until I started looking for a cheap HQ.

Tuesday, March 11, 2014

On the table now - Ork Wrecker


My idea for the Ork army currently under construction is to have each unit painted in different Clan colors but to use them ironically. For instance, most folks paint their Bikers as Speed Freaks because they like to go fast. So many folks do this, in fact, that it has become cliche. My plan is to pair the units and Clans in ways that you would not expect. I know that I have talked about this before, but this is the first example of an ironic unit. 

I bought this mini on eBay for about $25 which brings it in $10+ under a GW Trukk even with shipping. it is 1:32 scale which puts it a little big for 40k vehicles. The tires are just about the same size as Trukk tires so this should work fine. The plan is to combine this kit with some Ork bits and turn it into the Wrecker for my Speed Freak Lootas. The only real challenge I can see will be mounting the crane in such a way that will make it interchangeable with other turrets. 

Tuesday, March 4, 2014

On the table now - 20 Grots and Wulfen


The good thing about Grots is that they are cheep. The bad thing is that there are lots of them. 

Also, hiding the back are three Wolfen that I picked up for a pretty good price. I am going to use them as minis with Mark of the Wulfen in the SW army. 

Monday, March 3, 2014

Finished - ORKS ORKS ORKS ORKS!


I have not been posting much because I have been painting up a storm. Here are the 12 boys that ride in that sexy Trukk I posted about before. I could have posed them a little better, but time is up the essence here. They will get a photo shoot when I have more of an army to show off.

I would have preferred to have my Bad Moons be 'Arh Boys or Shoota Boyz but I needed to get my Ork painting down. There is nothing to say that I can not do them like that later. Also, if anything, Bad Moons as just Boyz is in keeping with the ironic Clans vs units theme that I am going for. I still tried to keep thrie ride and the unit as kitted out as I can by adding in all the upgrades.

I don't have time to do an epic post but there are a few little conversions that I want to show off:

Monday, February 24, 2014

Finished - Tau Darkstrider


Took a quick break from all those damn Orks to paint up Darkstrider. I decided that I was going to paint all of the Tau special characters in unique colors rather than the ice blue color scheme the rest of the army has. I knew that with a name like Darkstrider, I was going to pick a dark color pallet. I went with black jumpsuit and dark blue armor. I took a leaf out of the Dark Eldar book and tried to use the "black as a color" scheme. I did not start with black on the gun and armor but did start with a very dark blue then wash it black. After a little touch up, I did some hard edge highlight with a bright blue (I think Regal Blue).

I am happy with how he turned out. I thought that the mini turned out overall too dark so I tried to make the base darker than the mini. It did not work as well as I thought I would but turned out ok. He certainly stands out next to the rest of the army. 

Monday, February 10, 2014

Finished - Ork Trukk

 I have many armies. I am not bragging here, but one of my buddies says that playing me is like playing an entire local gaming club. I have about 4k in Blood Angles, 2k in Grey Knights, 3k in CSM, 2k in Space Wolves, 2k in Necrons, 2k in Tau in addition to a Baneblade and  Warhound Titan. All of that is painted and based. If I were a little bit more of a shut in, I would just play Apocalypse games in the living room against the cat.

Add to that long list Orks. At the start of 2012, I told myself that I would start painting new armies. Since then I have started Space Wolves and grown that army a lot. I have also rehab-ed a lot of my Tau. Now it is starting my (counts) 7th army!

This Trukk I bought off of Bartertown and it was mostly painted. The guy I bought it from was not really happy with what it looked like but all it needed was some highlighting and shading and it was ready for the table. I was not aware that it was missing so many parts when I bought it. It is missing a bar that goes over the top of the back bed and a boarding plank. The guy did magnetize the boarding plank in an ingenious way.

The plan for the Orks is to make a bunch of different clans but in unusual combination with the units. For instance, most people make their Bikers as Evil Suns (Speed Freaks). But I am going to make my Lootas as Speed Freaks with a Trukk. The Idea is that these Orks shoot up an tank or bikes, then drive up and strip them. I think I am going to try and convert their Trukk to a wrecker for those purposes.

I started with some Boyz because I had to. The Trukk was already painted in Bad Moon colors, so I painted my first squad that way too. More on them later!