Showing posts with label painting. Show all posts

Monday, January 1, 2024

Quick and easy power weapons with Tyran blue

 When the Gulliman Blue glaze was discontinued, I was lost for a way to do bright blue highlights. I limped by with Drakenhof Nightshade but that one was way too dark for how I did easy power weapons. With the new Tyran Blue shade, I think we are back in business!

1. Black base

2. Iron Hands Steel 

3. Runefang Steel

4. Tyran Blue 

5. Drybrush of Runefang Steel

6. You could also so some small hard edge highlighting on the very edges with a white or light blue.

Monday, February 22, 2021

Finished- Abandon the Despoiler


This project has been sitting on my to do list for maybe a year. I loved Abaddon in the previous editions and even did my own conversion out of the Terminator Lord kit and the old metal Abby. Turned out pretty good if I don't say so myself back in the day. Put a picture of the old one after the jump.

The armor is black base with a solid coat of Dark Reaper. Washed it black and Agrax to try and darken it down but that second wash didn't do much. Then I touched up the Dark Reaper and then did a highlight of Thunderhawk Blue on the hard edges and in the weird places that we highlight on pauldrons. Then on the areas I wanted to pop, I did a highlight of Ahriman Blue. It doesn't take much, bit it is effective. I think I could have taken it further around the Chaos star but I kinda like the subtilty. 

This was my first big project painting blue as black and I loves it. It turned out just how I wanted. I think I may go back with some more blue and make it pop more. I may use this and highlight with grey for any further Deathwatch minis. 

Monday, August 31, 2020

Finished - Potpourri

Since very much awesomely fixing the hatchet handle I actually HAVE done some painting. I finished a couple of Black Plague heroes, about half of the Black Ops heroes and an experimental mini that has been sitting half-finished for ages. 

Initially, I got to work on Lady Grimm and Glynda Battlestout with the same 10/0 detail that I approach most minis with. Frustrated at my chunky paints and fraying brushes I reached for new ones of each. While doing so, a corrupted version of an old axiom "don't let the great be the enemy of the finished." I knew it wasn't right but with the years of backlog I have, I can't take a week to paint a single mini. Let's get some colors down, a little detail on the faces and let's get them done. 

I finally have two of the very many Zombicide boxes finished in their entirety and that has me jazzed to finish some other boxes like special guests and Heroes boxes completely. To do that, we gotta get paint on minis. I am far from batch painting but I've stopped doing three stare highlighting and going blind with fine detail brushes. Part of me regrets this because I know I can do better but... but let's get things finished while we have spare time. 

Monday, July 13, 2020

Goodbye Space Cowboy

I did something for the first time in my almost two decades of painting and playing 40k. I sold a whole army. Tau were my first in 2004. The guy I played with most played Blood Angels and wanted to get out. So I bought his army and started BA in 2005. Somewhere around 2007 I started Grey Knights as a small auxiliary force that grew into an army. After that I started Chaos, Necrons, Space Wolves, Orks, Genestealers, and Knights. Never sold an army.

Until now.

Tuesday, June 23, 2020

Finished - Zcide Invader Workers

Been painting quite a bit of Zombicide stuff all over the place. Black Plague, Green Horde, Invader. I even outsourced painting of some of the Black Plague zombies to a commissioned painter for money and some printing. I used clay, rollers glue and a lot of time to make textured based for all the flipping zombies. Learning my lesson from that, I just wanted some simple Martian soil for the aliens and save the complex stuff for the survivors.
I found a pretty good tutorial for using the red crackle paint and painting red ground and it worked pretty well. I was skeptical about needing to base things brown, but the crackle pulls up the layer of paint below it and lots of the white primer shows through.

Aside from the bases, I decided to dip into contrast paints in the interest of getting all the Invader enemies painted unlike all the other Zombicides that sit waiting. I based the Workers Grey Seer though I would have liked to use something with a little more color. After that, the whole model gets a wash of Apothecary White. When that dries, the head and hands get a splooshing of Voluptuous Pink. I do a halfhearted blending of the areas by wiping my brush off and stippling around the edge while it is still wet. It is an amature technique with limited results but it is better than hard drying lines. With the base colors done, the bottom nails get painted with the Voluptuous Pink and no fading. The whole model gets a dry brush of Grey Seer to make it pop.

It is not my best work, but I have finished 5 of them in half the time it took me to paint any other mini. Sometimes I have to put quality on the back burner in the interest of getting stuff done.

Friday, May 1, 2020

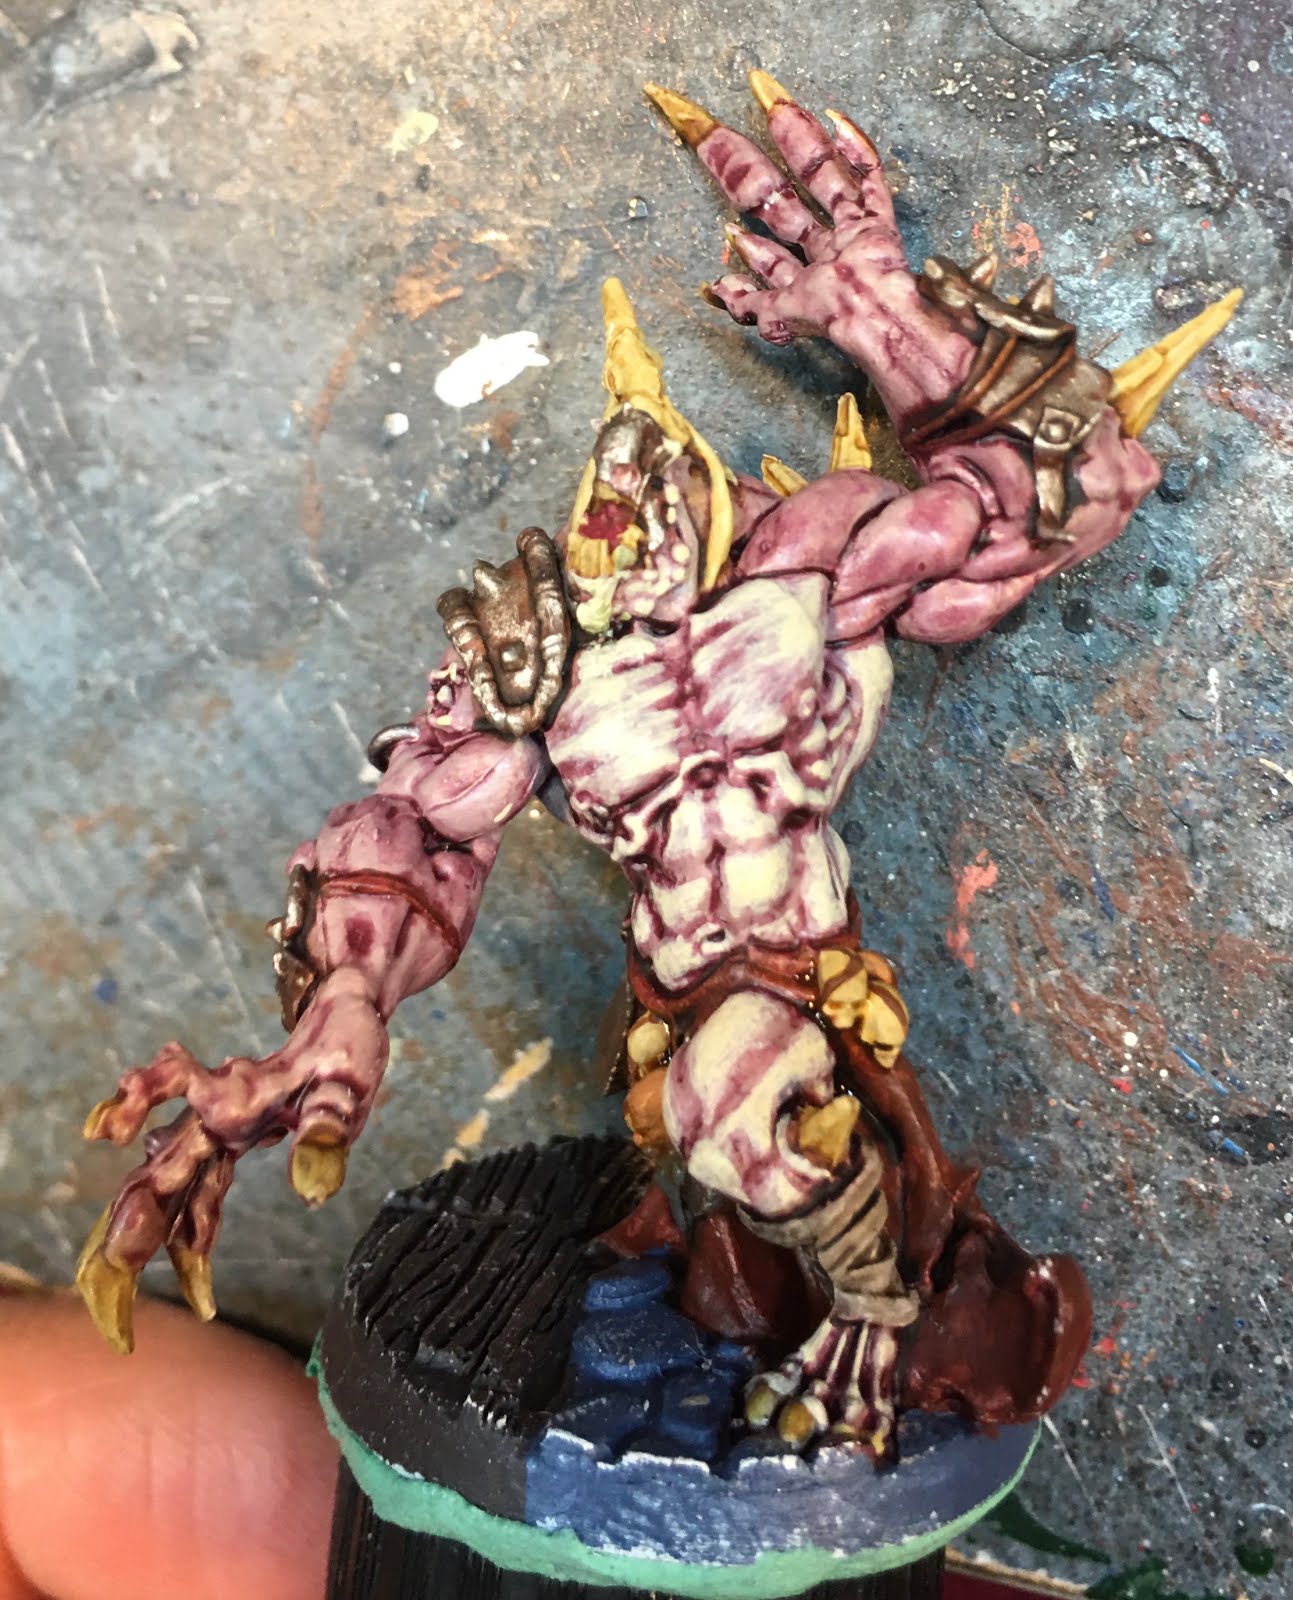
On The Table - Orc Abomination

I have wanted to paint an albino big monster for probably 2 years now but have not seen a technique that I liked or believed. GW has a recipe in their painting app for Pale Flesh (that looks more like parchment than skin) and Varicose Flesh (that looked a little too pink for me. Initially I wanted to try the Pale Flesh variant as I was trying to paint pale... flesh but it called for being shaded with Reikland Fleshshade. At the last moment I decided that is going to look too natural and I wanted something more pink. Varicose Flesh starts with Rakarth Flesh and to be washed with Carroburg Crimson. I was still skeptical but through I could always strip it if it looked stupid.

After washing I did think I looked stupid but pressed on anyway.

The recipe then called for Flayed One Flesh followed by Pallid Wytch Flesh. I did a test patch and didn't hate it so pressed on.

The more I painted the more I liked it. It has good depth, shading and tone. It is also surprisingly hard to mess up. Everything that is not streaky paint looks great. It fades and feathers nice. Even stippling does not look out of place. I aint even done the next stage of highlights.

If I had to do things over, I might go easier on the red shade. This is going to be my go to when I get around to doing my Ork Warboss.

Update:

I finished the Albino-Abomination and it turned out great. Next time I am going to go a little easier on the shading as it is overly dark for me.

I am especially proud of the eyes. I used solid Wazdakka Red for the pupils.

Further Update:

I tried the "pale flesh" recipe on a spare Abomination for Black Plague and it makes me glad I chose the other style. All told it is pretty solid slightly pale caucazoid flesh. It really lacked a variety in tone so I had to use some Carroburg Crimson in the deep parts. It might be good for speed painting lots of bare chests or bare arms, but it is no good for large patches of bare skin or faces.

It comes off pale but not albino. Now I have this pasty, naked mole rat of an Abomination in my box but at least I know now.

Sunday, April 29, 2018

Finished - Alpha Legion Terminators

Deleted the in-progress post about these minis. This is another in the series of of Alpha Legionaries for a Vyndica client. I talked him into the smoother lines of the Tartaros Terminators with the intent of "Chaosing them up" later. Initially, I thought this would be pretty easy, but when it came down to it I was flummoxed on how to make them look more like Chaos Marines.

I had a bunch of spiky bits left over from a CSM Terminator project and in a moment of inspiration, I just glued them to the sides of torso. I could have tried to dremel out channels on the sides to make them fit flush, but that would have been a lot of work with high risk for wrecking the minis.

Sunday, August 27, 2017

Touch Up - White Marking

Did some thinking and experimenting on the Ultramarines white markings and I came up with this.

Base Celestra Grey, wide highlight of Ulthuan Grey then White Scar on the edges. It helps dampen down the starkness of the white over the darker blue while still keeping it bright.

It also adds some depth to the white markings that the white on white lacked.

I don't know what I am going to do when it comes to doing the helmets of the veterans or the laurels, but I'll cross that bridge when I come to it. 

Wednesday, August 23, 2017

Finished - Ultramarine Test Marines

I wish I had titled these "finished" posts with the tag "stick a fork in" instead. Regardless these little blue devils are finished.

I started by spray painting the minis with Krylon "satin oxford blue" which is the closest that I could find to Kantor Blue and still not be gloss. I like matte or satin primer as the next layer tends to stick better. Because the primer and base were so close, I didn't waste much time in getting a good foundation.

To get a good base, I did an overbush of Ultramarines Blue or Altdorf Guard Blue as it is known now. I didn't make efforts to cover the recesses or cover up too much detail. Once the base color is down then it is time for the secondary colors. I paint black all the areas that I want black or silver straight black. The silver areas get a dose of Ironbreaker and the black areas are painted my new favorite color Eshin Grey before getting a heavy drybrush of Dawnstone. Both areas get washed black.

I used to use a 1:1 mix of Abbadon Black and Dawnstone as my base color for black with good success. I discovered that Eshin Grey is almost an exact match. I would rather have per-mixed paints for consistency. Also, if I was making a new batch, it took two pots of paint to make one batch of mix and it rarely lasted until gone as mixed and diluted paints tend to gum up on me.

Monday, April 17, 2017

Vyndica - Alpha Legion Lord

Wrapping up on the Alpha Legion CSM Lord for a Vyndica commission. I know that I haven't blogged about this project but it all came together pretty quickly.

The client, jtalley12, posted for an Alpha Legion leader for his army. He didn't give any real direction other than to say that if there were conversions that he would be willing to pay for them "if the price were right." In conversation with him, I confirmed that he wanted the standard blue/green colors and that he wanted a "tactical" look. He didn't really expound on what that meant but I took it to mean that he wanted them to look more like soldiers rather BDSM space demons.

I asked what he wanted and he said he trusted me and I could pick bits. I sent him links to some eBay posts for single Forge World Alpha Legion bits. I found some and, since his deposit just about covered them, I pulled the trigger.

This is when things start to get a little weird. The links I sent were to a bits seller in Germany. While I didn't point this out specifically, I kind of assumed that he looked at everything I sent him and I didn't need to hold his hand and walk him through things. I told him that I would keep him updated once the bits got here.

Saturday, April 8, 2017

Finished - DnD Mini

Behold! Adr Al'akhir in all of his glory. Major inspiration for this comes from the description of Kossuthan priest and their garb in Faiths and Avatars from 2nd Edition D&D. I knew he was going to be red and gold as those are thematic and I am pretty awesome at painting them. The silver areas are inspired by the box art.

I knew I wanted to do the hems in a burnt theme based on the description in F&A and I knew how to do it thanks to my flamers and plasma weapons in 40k. That was done with a dry brush of Mournfang Brown and then a drybrush/stippling of Abaddon Black. It was not homogenized enough for me, so I did a little wash of Agrax Earthshade to mute the colors.

The dark skin was an experiment. I had never done anything like this before. I based it with Bugman's Glow then washed it with Reikland Fleshtone. This did not make it dark enough for me so I washed it with Druchi Violet painted into the recesses. A touch up of Bugman's Glow and that was about it. I wish I could have highlighted it some more but the end result is ok.

Very happy with this mini. It cost me 50% of $25 as it is a set of 2 minis in a box. The paint job took considerable time for a single mini that bordered on 10 hours. I value it at $40. Total replacement cost is $63.

Looking forward to causing some serious damage with this class in the near future. 

Thursday, April 6, 2017

Vyndica - Zaku

Dear god, what have I done. I put in a bid for a commission on a "perfect grade" Gundam suit from the old Mobile Suit Gundam. I had put together similar models like the Dreamforge Knight proxies and I thought I could handle it.

This is the most complicated model I have ever attempted.

There are more sprues and bits of different kinds than in any kit I have ever seen. It makes the Dreamforge kits looks like single-post GW models. The head assembly alone is 13 steps.

I know that I can assemble and paint this doing honor to the model and the old series. I bid $120 on the job and I am going to earn every penny of that. 

Wednesday, April 5, 2017

On The Table - DnD Mini

I have done a lot of work on this mini since I posted last. I should have taken this picture after all the base colors were down. I think I have used every color of red on this mini so far and I am not even half way yet.

Based the mini Khorne Red and applied Wazdakka Red liberally over that. That was my overall base color to work up from. I washed it red (which is a mix of Fugan Orange, Seraphim Sepia and Carroburg Crimson), touched it up with Wazdakka Red and then did a pretty sloppy highlight of Evil Sunz Scarlette. It then got washed with Seraphim Sepia and then touched up with Evil Sunz Scarlette.

All that washing really sunk into the cracks and crevices especially on the front. In some spots it is so thick that it fills in the gaps. This is a mistake on my part for painting with too much beer in me.

Up next, the red needs some more work and then I start on the skin.


Saturday, April 1, 2017

On The Table - DnD Mini

I have fallen in with a bad crowd and they are into Monsters and Mazes... I mean Dungeons and Dragons 2nd Ed. The character I chose is a Firewalker, a Specialty Priest of Kossuth. He wears a combination of ring-mail and leather armor. His weapon of choice is a ball and chain with a back up of an OG sling.

I scoured the Reaper archives, but could not find anything close. After saying that I had looked fairly extensively on my own and wasn't intereested in the "build your own custom mini services" I posted on a very unhelpful Facebook group where the only suggestions were "look at Reaper minis" and "here is a link to hero forge." I swear people read like 5 words of a post then comment.

I found a DnD mini on eBay by chance from WotC that is kind of close but will require some modification. My plan is to swap that rod for a ball and chain. With a little re-position of his right hand to the horizontal position, he can be holding the chain in a pretty threatening position. I may be able to sculpt the ring-mail but I am unsure about it.

That is the plan, anyway.

As far as painting, I am going to do him in red/orange robes with burnt edges. I have a pretty good idea of how to do that. 

Sunday, March 26, 2017

On The Table - Vindicair Comission

Painted up this mini for a friend of mine. He says it is Chinese replica of a Vindicare Assassin and given that it is made our of off-color, brittle resin, I believe it. Pretty good cast though compared to some.

I based the mini in Kanto blue then painted a 1:1 mix of Darnstone and Abbadon Black on the harness and the weapon. The mask is painted straight Dawnstone. The whole mini got drybrushed with Dawnstone. After that, everything was ashed Nuln Oil.

I used the new dry compound for the first time and it is actually better for drybrushing than the regular stuff. Goes on more smoothly, don't have to wait for it to dry and overall easier to handle. I hope it lasts.

I did a very light dry brush of Dawnstone once the wash was dry to bring things back up. I then shaded the blue suit with Agrax Earthshade and Gulliman Blue. The black areas were hard edge highlighted with Dawnstone.

The pillar he is standing beside, was based Dawnstone and then washed Nuln Oil and Agrax Earthshade in between dry brushes. I did a final drybrush of Ushabti Bone to make it pop a little more.

Pretty simple painting and it didn't take that long. If this were a commission, I would probably charge $40 for it but that usually includes about $5 in shipping too.


Tuesday, February 28, 2017

On The Table - Deathwatch And Hard-edge Highlighting

Putting in some work on the last three Deathwatch Marines that I have planned. Not to say that they will be the last for this army by any stretch.

I have developed a new way of doing black armor that has sped me up considerably and gives a good result. I base the mini with 1:1 Dawnstone and Abaddon Black then dry brush with Dawnstone. I then wash the entire mini with Nuln Oil. This also takes care of my silver metal areas as well. Rather than using Nuln Oil to wash a second time, I find that I can get darker blacks and shadows as well as breaking up the mono-tone of grey on black. After the washes there is no touch up and I go right to hard edge highlighting.

Both of the sets of legs in the picture at at the same stage in painting but the ones on the right have a hard edge of Dawnstone.I posted this because I found the contrast (ha ha black and white puns) between the two striking. Hard edge highlighting takes me forever, it is hard to do and it can very easily go wrong. I think that it is totally worth it though.

The mini on the left is totally table-top quality but the little extra effort of the hard edge highlighting takes it over the top. It also takes what could be a very dark and shadowy model and makes it brighter. Painting dark colors in a bright and vibrant way is a skill that I have cultivated and this will come in handy with my next unpronounceable commission.

Tuesday, February 14, 2017

Vyndica - Dark Eldar Two-Stage Highlighting

In the last 24 hours I have made some progress on the Dark Eldar commission. Progress is still slower than I would like. I have a giant commission coming and need to clear the table.

I am going to take this opportunity to define some of my terms and painting process.

After priming the models and cleaning them up a bit, I based the minis in Xereus Purple. I don't have a good word for the major colors that I paint all over the mini as a base coat but there should be one. After that, the other base colors need to be painted. That was Sotek Green for the feet and shoulder guards, Ironbreaker for the weapons and Rakarth Flesh for the loin cloths. This is indicated by the top picture. If you just do base colors, this is flat painting.

After that, the whole mini gets washed in Nuln Oil... twice. Purple is really forgiving and loves black wash. Dark Eldar need to be... well, dark. Middle picture shows this. If you stop after things are washed then there is no word for the muddy mess that you created.

After the wash completely dries, the purple needs to be highlighted. This is a hard edge highlight but a very thick one. You have to be careful to stay out of the recesses to keep the deep shadows. The easy parts are the segmented armor plates. The hard parts are where there are no hard edges to follow like the curved helmets and the calves. There you just have o use your skill. Good thing is if you mess up, Druchii Violet wash fixes any places where you might have over highlighted. The figure in the middle in the bottom picture shows this well.

Here is where things slow down a bunch. A true had edge highlight is made with Genestealer Purple. It is very important not to "trace" the mini. A hard edge highlight should be of variable length. Thickest in the middle and tapering to nothingness near the sides. I keep trying to find good pictures of someone really messing this up but this is the best I can do. Less is really more when it comes to hard edge highlighting and this is where a painter's skill comes in.

Saturday, December 24, 2016

A Christmas Miracle

Last year, I had problems with clear coating and it fogging my miniatures just at the point of completion. The Tomb Blades and the Battlewagon were the worst affected but the Flash Gitz and a whole Slew of Deathwatch minis also got fogged. I was so upset at this that I listed them for trade.

Since this snafu, We have moved to a new house. In the finnished basement, we have a nice dehumidifier that runs all the time. It is the least humid basement that I have ever been in. While I was clearcoating some other minis inside ("use in a well-ventilated area" my ass), I decided to test out re-clearcoating some of the frosted minis. The test Deathwatch Terminator came out almost perfect. Encouraged, I did a few more. It worked again! I even took out the old Flash Gitz and they were rehabbed as well. Setting my teeth, I did the Battlewagon and it too looked better. Aside from the 40% humidity or less that it is inside and not using that Krylon MAXX garbage, I don't know what I changed to make this Christmas Miracle happen, but I am very happy it did.

Tuesday, November 22, 2016

On The Table - Corvus Blackstar

I did some work on the Blackstar. I finished all the sanding and joining. I basecoated it 1:1 black and grey like I do with my Marines, but I am starting to second guess that at this point. the painting style that I use on my marines relied on a total black wash to homogenize and shade the model. I've learned that trying to shade the whole model on a vehicle is usually a bad idea. It is impossible to get an even coat an the whole model and there are always large and visible mistakes. I think I am going to try and do a lighter drybrushing and paint on my wash rather than dipping.
I was very nervous about doing the red lines like the Codex models has. I've painted a few lines on my Tau models and it is hard to get the big ones right. I used painters tape to get the lines straight but really just eyeballed it.
The next step will be dry brushing grey on and then painting the silver areas.
I decided against all the gold on the Codex model. I am just going to all the large areas silver with gold skulls.

Wednesday, November 9, 2016

On the Table Now - White Scars Face

The Deathwatch Vets box is awesome. I love all the heads (though some are problematic), but there are no good White Scar ones. I like the classic top knot, I like the mongol-style beards. The head from Overkill is good but it is attached to the body. The face above is clearly meant to be a Space Wolf. With the addition of a CSM top knot and some creative painting of the chin as beard, as we have a first class White Scar head.
I've tried to up my face painting game recently. There was a time where I would do a basecoat of a mid-range flesh tone, wash it flesh, touch it up and call it good. I experimented with extra highlighting but the faces turned out looking more corpse-like that I wanted.
On a whim, I picked up Bugman's Glow thinking that I could use it to highlight leather in an interesting way. While, I never really integrated it into my leather paining, I did start using it to shade the deep wrinkles on faces. I still undercoat with Tallaran Flesh and basecoat with Cadian Fleshtone, but then I paint on the Bugman's Glow into all the places that need more depth. There is a little touch up of Cadian Fleshtone and only then do I wash it with Reikland Fleshshade. A little touch up and it is done.
Integrated into that mess, I have also started putting a little purple wash around and under the eyes. It started off on a fluke but this technique has really started to pay dividends.